Showing posts with label necklace. Show all posts

Friday, 20 April 2018

Fibre Arts at NSCAD

SeaWeed inspired necklace,
felt and embroidery
by Allison

Every week in class we begin with show and tell - where my students bring in the projects they are working on that demonstrate the techniques they have learnt. 

Allison, a marine biologist, is inspired by the shapes, colours and textures of seaweed. She is creating a necklace using felt and embroidery to achieve her desired result. 

I think it is fabulous!

Thursday, 30 July 2015

All things Gelato - my favourite Gelateria's and flavours in Florence


I have been eating my way around Florence, particularly when it comes to gelato. I quickly discovered that for the best gelato you must seek out Gelateria's that make the delicious goodness by hand.

The most delicious I have discovered are:

Antica Gelateria Fiorentina - this one is just around the corner from Academia Riaci, making it a great place to stop. They make some very unusual flavours such as Persian (rosewater and pistachio), and stracca (yoghurt, cinamon and honey)

Carabe  - a delicious stop on my walk home from school. Delicious flavours included kiwi fruit and watermelon

Delicious flavours of Gelata Santa Trinita
with the Ponto Vechio in the background

Gelata Santa Trinita - this place is so well known that there was a long line out the door, even at 11pm at night! And understandably so. I tried black sesame seed, and passionfruit. Absolutely delicious and unusual flavours.

Gelateria Edoardo - In the square of the Duomo. Try the red wine, combined cinnamon. Absolutely delicious! And perfect for a hot day. And the best time to go is lunch time around 12.15pm. For some reason this is when the line is shortest!

Vivoli -  - a little out of the way of the touristy places, this is the oldest gelateria in town. The make a particularly delicious coffee gelato


Delicious colours of the gelato spoons
I have also been charmed by the delightful colours of the gelato spoons and have been collecting them on my gelato foraging around Florence.

Gelato spoon necklace #1
I have been having a bit of fun creating some jewellery using my collection of plastic gelato spoons.

Gelato Spoon necklace #2

detail of Gelato Spoon Necklace #2

Making the jewellery is a good excuse for me to continue to try all the delicious flavours of gelato! That's my excuse anyway :) 

Thursday, 26 March 2015

Hemmed In

Continuing my exploration into creating fences using different mediums, Hemmed In is created incorporating textiles, ceramics and jewellery techniques.

Knitted cotton within fused silver 'gates'

The first step was to knit (with cotton) some panels of fence that are inspired by wire fences.

Knitted cotton dipped in porcelain slip

Next, I dipped the cotton in a high fire porcelain slip and I laid them out on a canvas board to dry. This worked well, but they had a 'front' and a 'back' from being dried flat. If I was to do this again, I would suspend them so that they had two interesting 'front' sides.

Painted with Cone 06 glaze

I wanted to apply gold lustre, gold leaf and decals onto the surface of them (they need a layer of clear glaze to adhere to the porcelain). So once they were fired (one firing all the way up to cone 10) I painted them with a thin layer of clear glaze.

The pale aqua are covered with clear glaze prior to firing.

I experimented with gold lustre, but wasn't incredibly happy with the results because it came out quite a dark copper gold.

I also experimented with putting gold leaf followed by decals that were fired in an enamel kiln at 1500 F degrees for a couple of minutes. The gold leaf remained light in colour and the decals were reminiscent of the blue willow ware that dates back to dinnerware of the 18th century.

Hemmed In

To attach the ceramic knitted pieces to the fence panels I used very thin silver wire to wrap them into place. I was inspired by the rustic and often ingenious ways fences are repaired. 

Hemmed In (detail)

The ceramic panels were dispersed between panels that were fused together with the fine silver wire.

I joined the fence panels together using a method used by the artist Alexander Calder, who whilst well known for his mobile sculptures, was also a prolific maker of jewellery.

He is one of my heroes because of his unorthodox approach to jewellery.

Thursday, 11 December 2014

End of Semester Summary

My first semester in the MFA program for studio was with Professor Gary Markle. Gary is the Head of the Fashion studio at NSCAD and he has extensive experience working in New York in fashion, film and sculpture. He was the ideal professor to work with given my interdisciplinary nature and desire to explore ideas across a range of materials.


Lichen was the launching point for a series of investigations and I represented shapes found within the lichen using paper, the lids of tins and enamel (a whole blog post was written about the enamel necklace here). The pieces also continue to reference my interest in pioneers and the isolation they experienced.


Continuing to explore my interest in women's domestic objects I made some thimbles and experimented combining porcelain with crochet and gold lustre.


Continuing to play with domestic kitchenware I was interested to see what happened when you filled the void with rocks, thinking about sense of place and your ties or attachments to a geographic location. 


Living in Canada enables me to objectively look at my Australian history and heritage. I am interested in how our ties to the past inform our present and I am exploring this through the imagery of cameos, chain and branches.


This final piece is still in the middle of being created. Originally a porcelain tea cup, it has been broken and pieced back together. All attached by a silver chain. Here I am interested in the notions of sentimentality and how we place such importance on fragile objects. 

All these ideas seem quite disparate at the moment although I am hoping to distill their essence in my next semester next year. Its going to be quite the journey! 

Thursday, 4 December 2014

Limited production pieces

Our last assignment for Jewellery 2 was to create a limited production line of jewellery. 

The intention for this project is to give us an idea of what it is like to create production pieces, starting with  designing a prototype - and then once the design had been tweaked - we then had to make 9 versions of the design.

Prototype of my pendant design
One of the great things about our Professor, Pam Ritchie, is that she encourages us to use materials not always associated with jewellery. So, inspired by my current love of lichen, I designed a pendant that incorporated found wood and copper discs that were covered with a green patina.


I was a little apprehensive at having to make 9 identical pieces, however once I got into the swing of things, I realised that there was a method to making on a larger scale. And I really enjoyed it.


Along with developing the prototype I also had to undertake some experiments on how to seal in the green patina so that it didn't rub off on the wearer. I started off with a clear matt enamel spray on the domes, but I felt that they needed to be shiny so I then experimented with a clear enamel.


I was having so much fun with the design that I also created matching earrings.


Here are the pendants all lined up waiting to be attached to handmade copper chain. They turned into an army of stick insects!

I totally forgot to take a picture of the pendant attached to the chain before I handed them in, so Ill have to share that with you in the new year when I get the marked pieces back. 

Thursday, 27 November 2014

Snakes and Ladders : Enamel and Linen necklace

For our final assessment in Enamelling we had to create something that was inspired by 'games'. The word could be loosely interpreted and I chose the Snakes and Ladders board game I remembered fondly from childhood.

Snakes and Ladders prototype 1

To begin with, I made two different prototypes, experimenting with combining metal and woven linen thread. The first prototype was difficult to wear as the metal lengths stuck into the skin.

Snakes and Ladders Prototype 2

Redesigning my idea, I changed the linen thread to be more representative of a snake that weaves its way through the ladder. The design also changed the way it was worn, and the metal lengths no longer stuck into the wearer.


Cutting holes in the sterling silver lengths 

The next step was to make the design in sterling silver. After forging lengths of wire, I then cut holes into the flattened surface.

Plique a jour enamelled sterling silver

Using Plique a Jour methods (French for letting in daylight) I applied transparent enamel onto the cutout surface of the sterling silver.

Detail of the final Snakes and Ladders piece

Using a finer width of white linen, I wove the Plique a Jour lengths into place.


But before doing so, I had to thread the linen through sterling silver metal tube, which was then forged prior to threading the linen on the loom.


And this is the final result. 

Thursday, 13 November 2014

Enamel Lichen Necklace

Our second assignment for enamel class called for us to incorporate at least four enamelled components, which were to then be created into a piece of jewellery or an object.

With my current fascination into lichen I wanted to continue to explore these effects. I set about undertaking a lot of samples to achieve a similar result looking at the colours and textures in the image below.

Image of lichen used for reference for the project
Working with 0.3mm thick, fine silver 1" discs that were cut and then bent into a conical form. I first enamelled the inside with Orange Red Ruby enamel. I love this particular colour. Gold is one of the colorants in the enamel powder and depending on whether it is against silver or coper determines its colour. Sometimes it is a rich gold, like the images below, and sometimes it is ruby grapefruit. It is delicious!

work in progress: the cones prior to being assembled

The outside of the cone was enamelled with a black layer, followed by a fine sifting of 'Candy'. One of the things I enjoy about Candy is that is easily oxidises in the kiln, giving it a faint green tinge and is a little unpredictable in its results. Perfect for representing lichen. 

detail of the components necklace

I wanted to create a piece of jewellery that could be worn, but also exists by itself as a beautiful object, so I strung all the individual 18 cones onto silk cord.

Components necklace

The idea is that you roughly wrap one cord around the other and the enamelled pieces hang like a pendant. It needs a little refinement to be practical, and Im incredibly excited about its prospects.


Thursday, 23 October 2014

Enamelling: Collaborative Assignment Stage 4

We are up to the final stage where my original piece gets returned.....

I was so excited to get it back to see what changes had been made to it.

One side, the front with a green background and white pull through spots had remained untouched the entire time.

Sam has removed all the enamel on the reverse side and she had covered with a transparent lime green enamel. There were also bits of wire and copper attached using the original holes of the piece. Unfortunately I was too focused on making the final changes that I totally forgot to take a photo. Sam's additions reminded me a little of bark, and I contemplated incorporating some wood to the final piece. But I wasn't too sure that the transparent lime green worked with the deeper blue green of the other side.

So I undertook some more enamel experiments, looking to replicate lichen on the other side. I removed all the transparent line green and used stump grey as the base coat, and a light coat of oriental red over the top. The result was an amazing pull through that also highlighted the textured metal underneath.

Reverse side detail

I wasn't too sure how to finish the piece. Originally I was going to turn it into a brooch, but I felt that it restricted the viewer as to which side they observed (I really liked both sides in equal measures)

Reverse side

So I crocheted a form using the holes in the metal as a starting point. I really liked the void, so I left it a little open, and then crocheted some chain.


Front side detail of crochet

I made a point of making the chain long enough so that it was ambiguous as to how it could be worn.

Front side 

For example, it could be a necklace, wrapped around the wrist, or even inverted and worn on the head.... 

It was an exciting breakthrough for me and I am going to continue to explore this method of working.


Thursday, 16 October 2014

Enamelling: Collaborative Assignment Stage 3

This week we selected a piece of paper which had a number written on it. Then working backwards, from the highest number to the lowest, each person in the class had the opportunity to select an enamelled piece to work on.

I drew number one, which meant that I was lucky last. This worked well for me, because I truly don't know which object I would've selected had I the choice. And I ended up with Tamika's piece, that had recently been worked on by Candy.


Candy's rational for her enamelled colours was that the shape reminded her of flames, so she re-enamelled it from yellow through to red.

Funnily enough, this piece caused me many sleepless nights, as I pondered on how I was going to create some changes acknowledging the work done by Candy, but also make it sympathetic to Tamika and her personality and design aesthetic.

I found that the strong almost primary colours were too much for the delicate nature of the piece. In addition the enamel was starting to chip off some of the smaller areas.

So I removed all the enamel using a sand blaster. I had forgotten that there was texture on the original piece (Tamika had enamelled it using transparent colours which allowed the texture to come through)

Tamika's artwork back to copper

Because of the fragile nature of one of the joins, I decided to cut it up into three pieces. I turned two pieces into an asymmetrical pair of earrings. 


The shape and patterning of Tamika's original design always made me think of water, so I wanted to use enamels that had those qualities. I combined transparent turquoise with copper green to get depth in colour, and used the pull though technique with opaque white. 
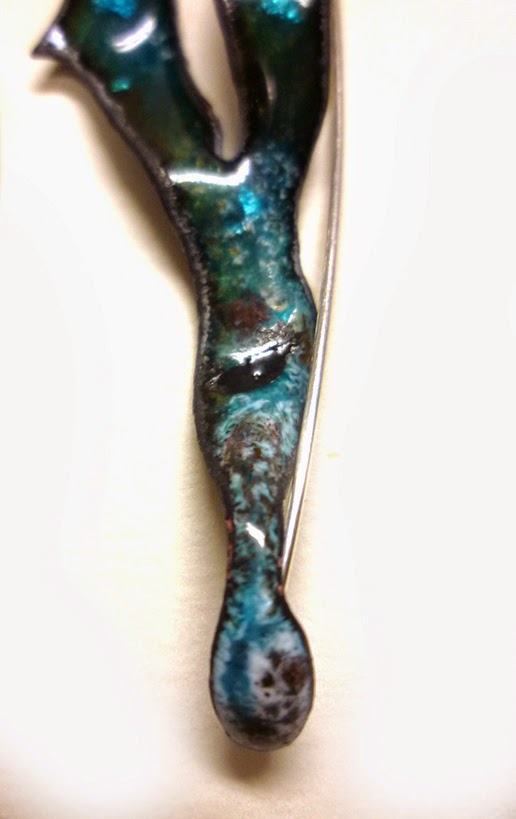
Detail of the opaque white pull through
Tiny bits of torn sterling silver foil was also added to give extra depth and reflective qualities.

Another detail of the earrings. 

The third piece I turned into a necklace.


Detail of necklace

When we had to present our changes to the class, I was really nervous. I didn't want to offend Candy.
But thankfully she was ok with my changes. Phew!

I have found this project to be incredibly enlightening. It has taught me that I am more concerned about working on another person's artwork, than I am on my own pieces. This is an outcome I find fascinating, since the concept of the project was to let go of ownership of your artwork and creativity.

Next week we get our original designs back for the original creator to finish. I wonder what mine will look like....


Thursday, 24 July 2014

Hill End Gate Neck Piece

Drawing further inspiration from my time at Hill End my next jewellery piece was informed by the etching below. 

Study of a Hill End gate. Etching 2013

The gate was constructed in wood by cutting slots in the horizontal bars, and the vertical posts were fitted into these holes. I remember being quite taken by this gate design, as I had not seen anything quite like it in my travels.

I enjoy creating marquettes before commencing a design as this helps me work out the size and how the design works in space. Its also incredibly important when working in silver as this helps save costs that may otherwise be wasted through the design process.


So I chose to recreate it in silver, drilling holes through the horizontal bars. The intention of this piece was to pivot on a central horizontal bar, allowing the vertical posts to move with gravity. Below is my first attempt.

Gate Neck Piece #1 detail

Gate Neck Piece #1
Whilst soldering, the tube of silver (second horizontal bar), also filled with solder which rendered the rotating design useless.

Back to the drawing board for attempt and design #2.

The design changed slightly and the pivoting point is now central to the neck piece. I also decided not to solder the tube to the framework, rather, slotting it in and allowing it to be held with silver wire which threads through the piece.

Gate Neck Piece #2 detail
 
Gate Neck Piece #1
The fun thing with this design is the kinetic movement and sounds created whilst the piece spins. The design reminds me a little of music written on a sheet, and the sound is reminiscent of rain on a corrugated tin roof.

LinkWithin

Related Posts with Thumbnails