Thursday 30 October 2014

Lichen Brooch and Burdock Hair Pin

Along with learning enamelling, I have also been continuing to learn and improve my jewellery making abilities with Pam Ritchie. Pam is an amazing artist who often incorporates unusual materials in her work, such as plastic and found objects and she encourages her students to do the same.

Our first assignment was to make a pin back. Rather than just make a pin back, our class all decided to make an interesting pin back.

I had picked up a beautiful piece of lichen earlier in the week. Given my love of them and their relevance to my work, I thought I would include it in my pin back.

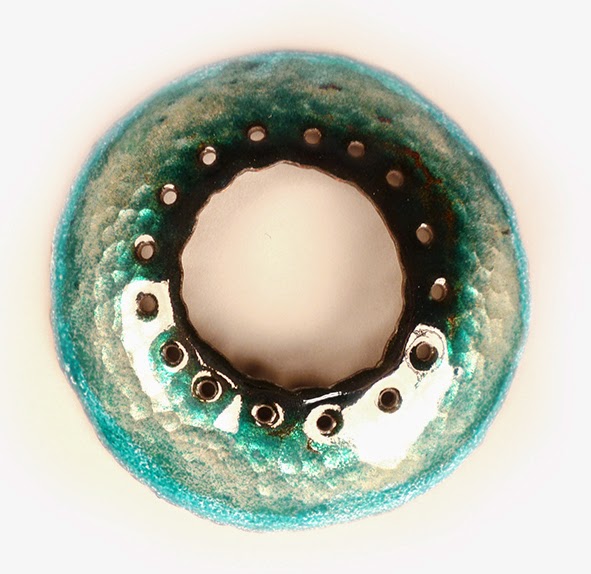
This is what I made:

Brooch with living lichen
3.3 x 6.3 cm
Pin back detail
before the lichen was attached

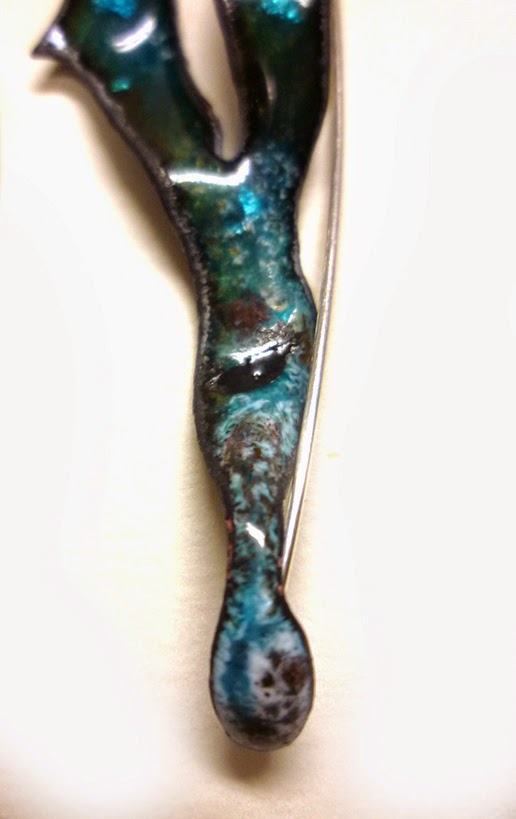
And our first major project was to create something that was inspired by an image that was chosen in class. The image I chose focused on communication, and also hair. So I decided to create a hair pin, in reference to Geisha. This was the final result:

Fine Silver Hairpins
containing burdock seed
Initially the pins were designed to be empty. But the wires seemed to loose definition when pinned in the hair. So it was decided that they needed to contain something.

Dried burdock seed hair pin

I stumbled across some burdock in a vacant block of land in the middle of the city, and thought that these weeds would be perfect. I see weeds as a metaphor for pioneers, or settlers.

Dried burdock detail
I was also amazed at just how sticky these seeds were. They stuck to my fingers and even plastic (just like velcro)
Green burdock hairpin
 The green seeds were less sticky.

Green burdock detail.

An exciting development with this discovery is that seeds contain so much information. So I see these hair pins containers for information or communication. Originally I was thinking about Victorian lockets and how they do this.....  Im really looking forward to exploring this concept further.


Thursday 23 October 2014

Enamelling: Collaborative Assignment Stage 4

We are up to the final stage where my original piece gets returned.....

I was so excited to get it back to see what changes had been made to it.

One side, the front with a green background and white pull through spots had remained untouched the entire time.

Sam has removed all the enamel on the reverse side and she had covered with a transparent lime green enamel. There were also bits of wire and copper attached using the original holes of the piece. Unfortunately I was too focused on making the final changes that I totally forgot to take a photo. Sam's additions reminded me a little of bark, and I contemplated incorporating some wood to the final piece. But I wasn't too sure that the transparent lime green worked with the deeper blue green of the other side.

So I undertook some more enamel experiments, looking to replicate lichen on the other side. I removed all the transparent line green and used stump grey as the base coat, and a light coat of oriental red over the top. The result was an amazing pull through that also highlighted the textured metal underneath.

Reverse side detail

I wasn't too sure how to finish the piece. Originally I was going to turn it into a brooch, but I felt that it restricted the viewer as to which side they observed (I really liked both sides in equal measures)

Reverse side

So I crocheted a form using the holes in the metal as a starting point. I really liked the void, so I left it a little open, and then crocheted some chain.


Front side detail of crochet

I made a point of making the chain long enough so that it was ambiguous as to how it could be worn.

Front side 

For example, it could be a necklace, wrapped around the wrist, or even inverted and worn on the head.... 

It was an exciting breakthrough for me and I am going to continue to explore this method of working.


Thursday 16 October 2014

Enamelling: Collaborative Assignment Stage 3

This week we selected a piece of paper which had a number written on it. Then working backwards, from the highest number to the lowest, each person in the class had the opportunity to select an enamelled piece to work on.

I drew number one, which meant that I was lucky last. This worked well for me, because I truly don't know which object I would've selected had I the choice. And I ended up with Tamika's piece, that had recently been worked on by Candy.


Candy's rational for her enamelled colours was that the shape reminded her of flames, so she re-enamelled it from yellow through to red.

Funnily enough, this piece caused me many sleepless nights, as I pondered on how I was going to create some changes acknowledging the work done by Candy, but also make it sympathetic to Tamika and her personality and design aesthetic.

I found that the strong almost primary colours were too much for the delicate nature of the piece. In addition the enamel was starting to chip off some of the smaller areas.

So I removed all the enamel using a sand blaster. I had forgotten that there was texture on the original piece (Tamika had enamelled it using transparent colours which allowed the texture to come through)

Tamika's artwork back to copper

Because of the fragile nature of one of the joins, I decided to cut it up into three pieces. I turned two pieces into an asymmetrical pair of earrings. 


The shape and patterning of Tamika's original design always made me think of water, so I wanted to use enamels that had those qualities. I combined transparent turquoise with copper green to get depth in colour, and used the pull though technique with opaque white. 

Detail of the opaque white pull through
Tiny bits of torn sterling silver foil was also added to give extra depth and reflective qualities.

Another detail of the earrings. 

The third piece I turned into a necklace.


Detail of necklace

When we had to present our changes to the class, I was really nervous. I didn't want to offend Candy.
But thankfully she was ok with my changes. Phew!

I have found this project to be incredibly enlightening. It has taught me that I am more concerned about working on another person's artwork, than I am on my own pieces. This is an outcome I find fascinating, since the concept of the project was to let go of ownership of your artwork and creativity.

Next week we get our original designs back for the original creator to finish. I wonder what mine will look like....


Thursday 9 October 2014

Enamelling: Collaborative Assignment Stage 2

This week we drew numbers which corresponded with everyone's enamelled pieces. I got number 5, which happened to be JiHoo Lee's ring. Hoo is from South Korea and on exchange here in Canada for 6 months.

Hoo's ring
I love the design, its a very simple, yet clever and effective ring. It is made from one piece of copper which has been manipulated and threaded through itself to create the form.

One of the reasons why I think it is so clever is because the solder used to form shapes in jewellery often will melt in the enamelling kiln, so designs with enamelware need to take this into consideration.

Hoo modelling her ring, top view

Hoo modelling her ring, side view
Our assignment for this week as to manipulate up to 40% of the surface area.... I wanted to add to it, without compromising the design.

So I decided to use a stencil technique.

Stencil resist using a pressed flower

I have been collecting and pressing flowers recently. I am particularly drawn to the flower that grows wild called Queen Anne's Lace

Using a pressed Queen Anne's Lace flower, cobalt blue enamel and a 200 mesh sifter I gently sifted the enamel onto the ring.

And this is the result.

Hoo's ring with Queen Anne's Lace flower stencil - in progress.
Image by Thomas Miko

Hoo's ring with Queen Anne's Lace stencil
Image by Thomas Miko

Ill see if I can find an image of the changes to my piece that Hoo made (strangely enough we got each others piece!)


Thursday 2 October 2014

Enamelling: Collaborative Assignment Stage 1

Our current class assignment for Enamelling is an exercise to expand the creative process by working collaboratively, where multiple creative minds work together often the partnership leads to greater objectivity in decision making whilst learning to become detached, or at least, less precious about the artwork.

The object of the assignment is to explore enamelling techniques in relation to form, whilst working within a collaborative process.

Stage 1: Each student must make a form which is then enamelled using the techniques being taught in class.

Hollowware formed metal object approximately 8cm in diameter 
This is my shape prior to the enamelling process. We are not allowed to disclose to the class what the intention of the form is, allowing for unrestricted creativity for the other students.

One side enamelled using pull through techniques

I then enamelled the shape, using a result I achieved (read: stumbled across by accident) whilst doing tests. 

Detail of pull through technique


The other side was undertaken in a similar fashion using the same enamels, but a slightly different application, to allow for the texture in the metal to show through.

Other side of copper form.

Detail of hammered metal surface under the transparent flux and enamels.
Stage 2: The object is them passed onto one of the other students. They then can transform 40% of the total enamel surface. It will be interesting to see what changes the object undergoes through being worked on by different people with different aesthetics.

Stage 3: The form is then selected by another student who has free artistic licence to decide how to best 'edit' the piece and make the necessary changes. All decisions must be justified.

Stage 4: The final stage of the assignment is when the piece is then returned to the originator, who then has the opportunity to finish off the piece, or to create a new piece based on the information gathered during the collaborative process.

Watch this space as the project progresses!

LinkWithin

Related Posts with Thumbnails