Showing posts with label brooch. Show all posts

Friday, 16 June 2017

PIN 7 exhibition at ANCA Gallery, Canberra

#178
Felt, cotton, stainless steel wire, purple turquoise

I am delighted to share with you that my work will be featured in PIN 7, is the seventh annual brooch exhibition at ANCA Gallery in Canberra, Australia. The pins continue to explore the theme 222 Grips for a stone, a 2 year fascination and investigation of different ways to 'grip' a stone. In this part of the series, the stones are semi-precious, and a variety of stitching methods have been used to fasten them in place.

# 174
Felt, cotton, stainless steel pin, quartz crystal
The concept of reducing scale and honing in on a wearable miniature platform appealed to artists from a broad range of practices including sculptors, printmakers, painters, ceramicists, silversmiths, machine makers, photographers, wood workers and glass artists. Following the success of the
inaugural exhibition ANCA ran ‘PIN’ exhibitions in 2012 (rePIN), 2013 (PINup), 2014 (PINHaH4), 2015 (sPIN) and 2016 (PIN SIX).
 
#175
Felt, cotton, stainless steel wire, opalite 
ANCA Gallery is running this hugely popular exhibition for the seventh time in 2017. PIN 7 will be exhibited at ANCA Gallery from Wednesday 28 June to Sunday 9 July 2017. 
#177
Felt, cotton, stainless steel wire, quartz druzy and Nova Scotian pebble


Thursday, 18 June 2015

sPIN exhibition at ANCA


sPIN is ANCA Gallery's fifth annual exhibition of miniature wearable artworks Australian artists.

Some of my fence brooches have been selected to be displayed in the exhibition. They continue to explore surface (lichen markings through enamel), construction (using beads to explore mesh techniques), and repair (textile techniques to mend broken fences). 

Fence Study #3
Copper, sterling silver, enamel
2015 
8 x 5 x 1 cm
$150


Fence Study #5
Sterling Silver, glass beads
2015
5 x 7 x .5 cm
$150

Fence Study #2
Sterling silver
2015
8 x 5 x 1 cm
$150


The exhibition's OPENING EVENT will be from 6pm-8pm Wednesday 24 June and the show will run until Sunday 5 July 2015. 


ANCA Gallery: 1 Rosevear Place Dickson ACT 
Gallery hours 12-5pm Wednesday to Sunday


Thursday, 4 June 2015

IOTA Pop-Up Gallery

Mireille Bourgeois is the curator and owner of IOTA Gallery, an invigorator of unconventional artistic and social practices, and a producer of forward thinking contemporary art discourse. 

I was approached to be part of the IOTA:Gallery's Pop Up show that is being held as part of the Credit Union Atlantic's Small Business Saturday.

Along with 13 other artists who working various disciplines such as printmaking, performance, painting, text-based, jewellery and sculpture, our work will be available for viewing on Saturday, 6 June, at Credit Union Atlantic, 5670 Spring Garden Road, Halifax. 

The exhibition will continue online and artwork will continue to be available for purchase until 20 June 2015.

Here's a sneak peek of some of the works that I created for the show: 


Fence Study # 1 Brooch
Sterling silver
2015
8 x 5 x 1 cm
$200

Fence Study #2 Brooch
Sterling silver, porcelain, decal
2015
8 x 5 x 1 cm
$150

Fence Study #4 Brooch
Wood, sterling silver
2015
8 x 5 x 1 cm
$100

For the complete online exhibition visit IOTA:Gallery's website.


Thursday, 26 February 2015

Keraflex experiments

I have been wanting to experiment with Keraflex ever since I heard about it when I first studying ceramics a couple of years ago. It is super thin ceramic that comes in flat sheets (0.5mm or 1mm thick) very much like paper. It is held together with a binding agent which makes it flexible when soaked in water and it provides the opportunity to make ceramic  products which are extremely thin and light.

Recently I have been playing with it. Experimenting with stitching to hold it together to create different sorts of forms.


Stitched keraflex (white bottom left corner)
Above are some samples to see what happens when the form is held together using thread before being fired in the kiln. In this image there are also stitched cardboard and copper samples where I am experimenting with form.


Most of the stitched pieces broke during the firing. But the shards were equally beautiful and intresting shapes, so I attached them to one of my gate like structures. I anticipate that this could be a brooch. 

Despite being really thin, the material is quite strong when fired to cone 10. 

Paper marquette of necklace idea

I also experimented with making cone shapes. With the intention of making a necklace similar to the paper version above.

Keraflex cones before firing
Keraflex cones after firing with gold lustre
I like the white porcelain combined with the gold lustre. But to get gold lustre to work, they need to be glazed with clear first (fired to cone 6). In the pieces above, I glaze only the bits that are now gold, so there is also the contrast between matt porcelain and shinny gold.

I have moved on from the original cone idea, and I am enjoying working with the shards. So I am thinking that these will be broken and reassembled along the same lines as the brooch idea.


Thursday, 5 February 2015

Runcible Spoon

Our first big project for Advanced Techniques Jewellery class was to make a Runcible Spoon.

Runcible was a term first coined by Edward Lear in 1871 in the poem The Owl and the Pussycat in the third verse.

They dined on mince, and slices of quince, 
Which they ate with a runcible spoon;   
And hand in hand, on the edge of the sand, 
They danced by the light of the moon, 
The moon, 
The moon, 
They danced by the light of the moon.

It is a nonsensical term and we were asked to design a spoon for a nonsensical purpose, which included a bezel setting.

With my interest in pioneers and landscapes I decided it could be fun to make a mini shovel which could for digging yourself out of trouble, or perhaps digging yourself deeper into trouble. Playing on the colloquial saying 'keep digging'.


Of course, not content with using hard stones which are easier to set (because they don't break) and only silver, I decided to incorporate opals I had bought in Australia at Christmas. I wanted to use opals because they are uniquely Australian, they are my birthstone, and they are made up mainly on solidified water. They are also considered a soft stone, and will chip easily.


I also wanted to make the bezel setting out of gold, because the warm colour of the metal enhances the colours in the opal.

Combining silver and gold was a new experience for me. And it took quite a few goes to get it right. At first I was using 22k gold solder to try and attach the bezel, but all I managed to do was melt the silver plate. After talking to a couple of established jewellers, they all suggested that I use silver solder instead. I did, and had a much better result. Yay! 


The shovel idea originally was going to be attached to a stick, but as the idea evolved it turned into a brooch-like pocket watch. There the handle can be attached to your sweater, and the chain is long enough for the shovel to be placed in the pocket. 

I ended up making 3 handles to get the perfect result (I didn't like the pin connection on the first one, and in the second one the stone chipped) but during the process I have ended up with a series of brooch-like pocket jewellery.

The first is the shovel, the second is a pocket thimble/bucket and the third handle is going to be attached to a handkerchief (which is still in the process of being made).

Image by Deng Chen


Thursday, 30 October 2014

Lichen Brooch and Burdock Hair Pin

Along with learning enamelling, I have also been continuing to learn and improve my jewellery making abilities with Pam Ritchie. Pam is an amazing artist who often incorporates unusual materials in her work, such as plastic and found objects and she encourages her students to do the same.

Our first assignment was to make a pin back. Rather than just make a pin back, our class all decided to make an interesting pin back.

I had picked up a beautiful piece of lichen earlier in the week. Given my love of them and their relevance to my work, I thought I would include it in my pin back.

This is what I made:

Brooch with living lichen
3.3 x 6.3 cm
Pin back detail
before the lichen was attached

And our first major project was to create something that was inspired by an image that was chosen in class. The image I chose focused on communication, and also hair. So I decided to create a hair pin, in reference to Geisha. This was the final result:

Fine Silver Hairpins
containing burdock seed
Initially the pins were designed to be empty. But the wires seemed to loose definition when pinned in the hair. So it was decided that they needed to contain something.

Dried burdock seed hair pin

I stumbled across some burdock in a vacant block of land in the middle of the city, and thought that these weeds would be perfect. I see weeds as a metaphor for pioneers, or settlers.

Dried burdock detail
I was also amazed at just how sticky these seeds were. They stuck to my fingers and even plastic (just like velcro)
Green burdock hairpin
 The green seeds were less sticky.

Green burdock detail.

An exciting development with this discovery is that seeds contain so much information. So I see these hair pins containers for information or communication. Originally I was thinking about Victorian lockets and how they do this.....  Im really looking forward to exploring this concept further.


Thursday, 23 October 2014

Enamelling: Collaborative Assignment Stage 4

We are up to the final stage where my original piece gets returned.....

I was so excited to get it back to see what changes had been made to it.

One side, the front with a green background and white pull through spots had remained untouched the entire time.

Sam has removed all the enamel on the reverse side and she had covered with a transparent lime green enamel. There were also bits of wire and copper attached using the original holes of the piece. Unfortunately I was too focused on making the final changes that I totally forgot to take a photo. Sam's additions reminded me a little of bark, and I contemplated incorporating some wood to the final piece. But I wasn't too sure that the transparent lime green worked with the deeper blue green of the other side.

So I undertook some more enamel experiments, looking to replicate lichen on the other side. I removed all the transparent line green and used stump grey as the base coat, and a light coat of oriental red over the top. The result was an amazing pull through that also highlighted the textured metal underneath.

Reverse side detail

I wasn't too sure how to finish the piece. Originally I was going to turn it into a brooch, but I felt that it restricted the viewer as to which side they observed (I really liked both sides in equal measures)

Reverse side

So I crocheted a form using the holes in the metal as a starting point. I really liked the void, so I left it a little open, and then crocheted some chain.


Front side detail of crochet

I made a point of making the chain long enough so that it was ambiguous as to how it could be worn.

Front side 

For example, it could be a necklace, wrapped around the wrist, or even inverted and worn on the head.... 

It was an exciting breakthrough for me and I am going to continue to explore this method of working.


Thursday, 17 July 2014

Hill End Gate Brooch

My next jewellery project was to make a brooch incorporating the newly learnt skills and techniques of cold joins or rivets. 

Continuing to gain inspiration from the gates and fences from Hill End, I referred back to one I studied during my residency, and produced a non-toxic etching from the same subject matter. I was particularly inspired by this one, as it was held together with bolts, which would have a similar 'look' to rivets when recreated in metal.

Rose Cottage, Etching 2013

Inspired, I built a marquette using wood to get an idea of size and scale. 


Hill End Gate Brooch Marquette, 2014

The final brooch was completed using copper sheet cut into strips and all joins have been riveted in place also using copper. We were also shown how to set a bezel cut jewel in between two layers of metal, and so I incorporated this technique, using a pink cubic zirconia.

Hill End Brooch, copper + pink cubic zirconia. 6cm x 6cm

Thursday, 26 June 2014

Material Matters: Foraging for wood

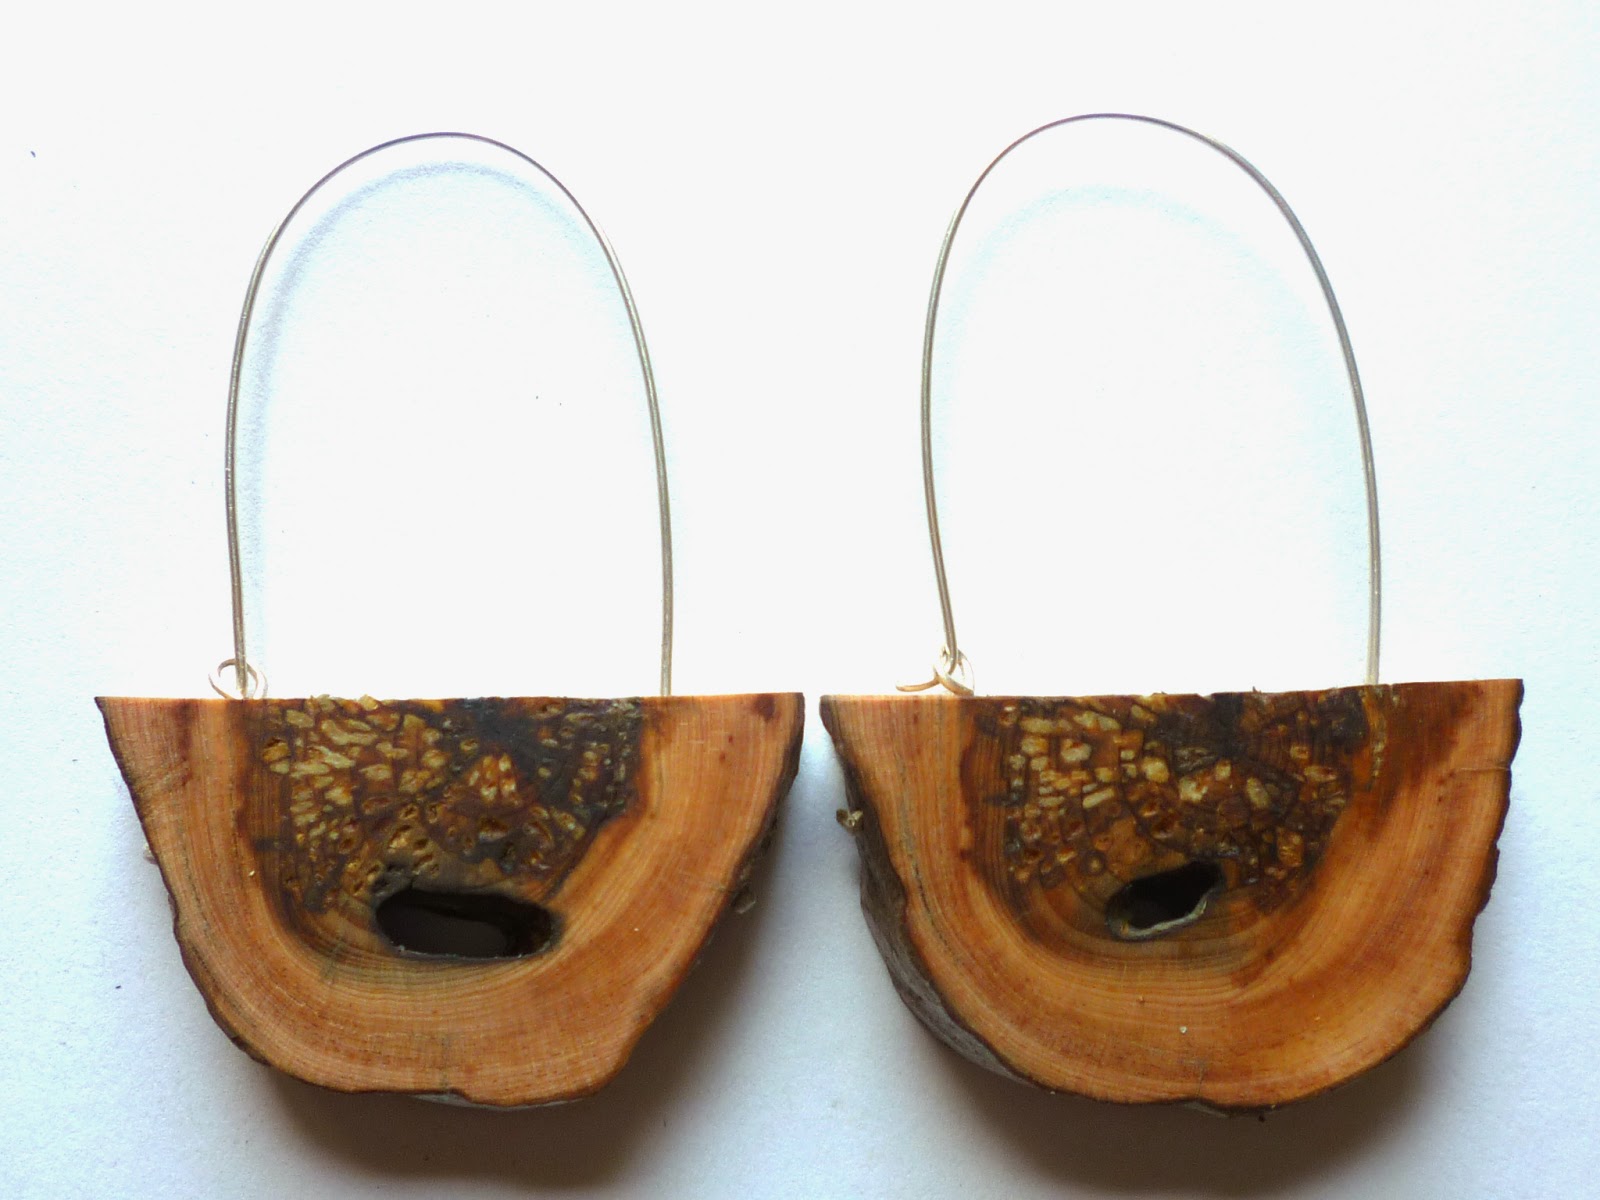
I got such great results from slicing into found pieces of wood (see last weeks post about wood and resin) that I decided to continue working with this method of using wood collected in the bush.

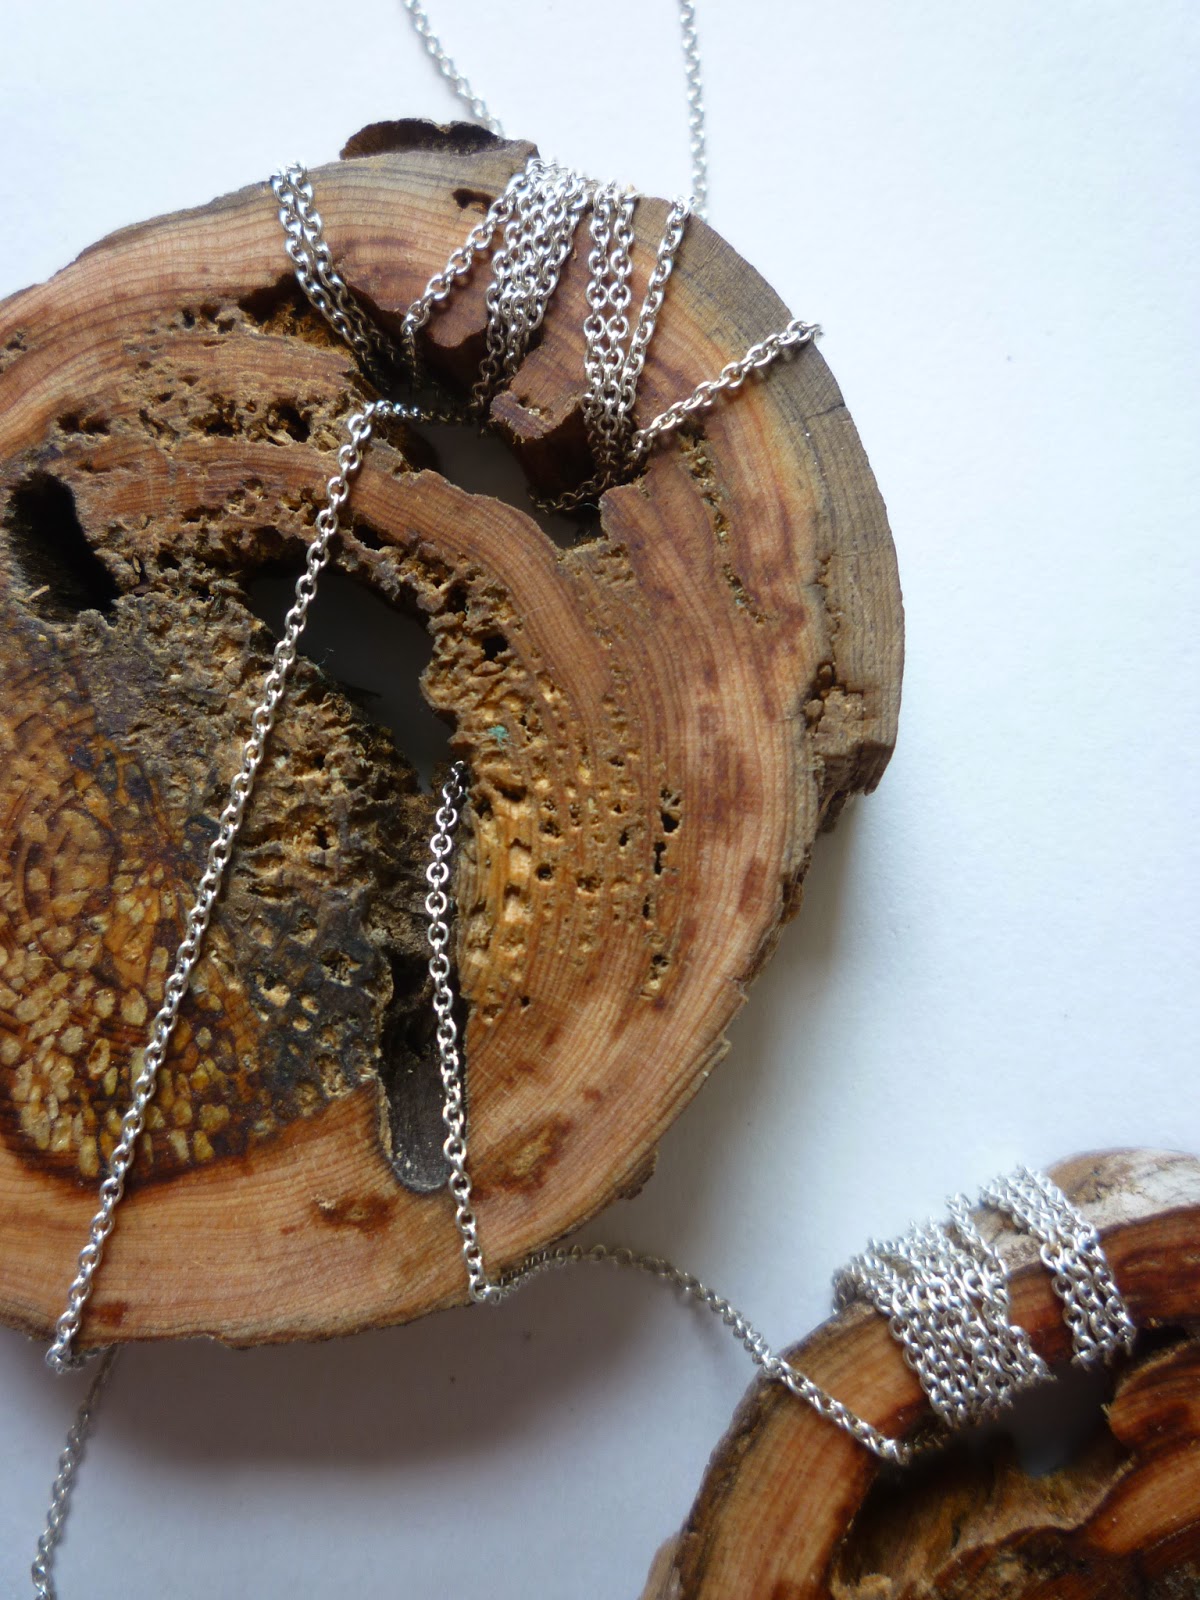
I found a great piece that measured about 8cm in diameter with weathered, sun bleached bark that I thought could be interesting to work with. To my delight, when I started slicing it on the band saw, the interior was just, if not more, interesting combining beautiful wood grain with interesting patterns eaten out of the wood by insects.


I was interested to see what would happen if I combined the sliced wood with precious metals such as sterling silver chain. The chain began to represent all sorts of things, like the thick heavy chains that are used to keep the cars of the old bush tracks. And through using such fine chain, it also started to talk about the delicate balance of nature. 


A Stitch in Time

A stitch in time (detail)
I created a needle by soldering a length of sterling silver wire to the chain to assist with threading the chain through the slices of wood. Following on from my thoughts about time and the environment, this became a conceptual piece called 'a stitch in time'. I decided to leave the needle attached as part of the finished piece.

Hanging on by a Thread

Hanging on by a Thread (detail)

I also finely sliced and re-threaded a selection. They move nicely when worn and made a lovely soft rattle when moved.


I experimented and made some large brooches. 


And also some earrings. These are the beginnings of a new line of jewellery and can be bought in my online store


LinkWithin

Related Posts with Thumbnails