Showing posts with label enamel. Show all posts

Thursday, 18 June 2015

sPIN exhibition at ANCA


sPIN is ANCA Gallery's fifth annual exhibition of miniature wearable artworks Australian artists.

Some of my fence brooches have been selected to be displayed in the exhibition. They continue to explore surface (lichen markings through enamel), construction (using beads to explore mesh techniques), and repair (textile techniques to mend broken fences). 

Fence Study #3
Copper, sterling silver, enamel
2015 
8 x 5 x 1 cm
$150


Fence Study #5
Sterling Silver, glass beads
2015
5 x 7 x .5 cm
$150

Fence Study #2
Sterling silver
2015
8 x 5 x 1 cm
$150


The exhibition's OPENING EVENT will be from 6pm-8pm Wednesday 24 June and the show will run until Sunday 5 July 2015. 


ANCA Gallery: 1 Rosevear Place Dickson ACT 
Gallery hours 12-5pm Wednesday to Sunday


Thursday, 9 April 2015

Pioneer Landscapes on exhibition at Craft ACT: Craft + Design Centre

Pioneer Landscapes is a selection of works created in response to my Artist in Residence at Hill End, NSW in 2013. 

Lichen Bells 2014
Silk, fine silver, enamel
Image: Art Atelier


Steel String Wood Necklace 2014
Materials: steel, cotton, wood
Image: Art Atelier

The impact on the landscape by the pioneers was evident by the scarred earth, colonial architecture and forest re-growth. I was fascinated by the bush fences in various states of disrepair and the decorative picket fences of the townships which clearly delineated ownership of space by the early colonial settlers. Despite the impact on the Australian bush by the pioneers, the resilient nature of lichen covered all surfaces. The texture and colour of it captivated me and I noticed that it grew on trees, rocks, fences and even on the sealed roads. 

I commenced a new body of work in 2014 which explores the materials and construction methods used to create these fences whilst incorporating ideas of regrowth and regeneration through the symbolism of lichen. 

Pioneer Landscapes at Craft ACT : Craft + Design Centre
Image courtesy of the Gallery

Pioneer Landscapes at Craft ACT : Craft + Design Centre
Image courtesy of the Gallery

Pioneer Landscapes at Craft ACT : Craft + Design Centre
Image courtesy of the Gallery

The experience at Hill End had a lasting impact on me and it continues to inform my work  Master in Fine Arts (MFA) degree at NSCAD (Nova Scotia College for Art and Design) in Halifax, Canada.

For more images of the exhibition please visit my Facebook page


Thursday, 19 March 2015

Fence marquettes

My studies of fences in the Australian and Canadian landscape has resulted in some of the following experiments.

Woven copper, enamel
Inspired by fences in the snow

Copper Fence
inspired by the old fences in front of Colonial Buildings
A progression of the above idea
Potentially a brooch

Silver with copper rivets & knitted silver wire.
Inspired by a wire gates at Hill End

Steel wire, silver wire, glass beads
A progression of the above idea incorporating beads
and experimenting with a different netting technique


Sticks and copper wire
Experimenting with a different netting technique

Copper and cotton
Experimenting with a flat sheet and bending it
The thread just happened...

Copper
More experiments with bending a flat sheet of copper 

Thursday, 11 December 2014

End of Semester Summary

My first semester in the MFA program for studio was with Professor Gary Markle. Gary is the Head of the Fashion studio at NSCAD and he has extensive experience working in New York in fashion, film and sculpture. He was the ideal professor to work with given my interdisciplinary nature and desire to explore ideas across a range of materials.


Lichen was the launching point for a series of investigations and I represented shapes found within the lichen using paper, the lids of tins and enamel (a whole blog post was written about the enamel necklace here). The pieces also continue to reference my interest in pioneers and the isolation they experienced.


Continuing to explore my interest in women's domestic objects I made some thimbles and experimented combining porcelain with crochet and gold lustre.


Continuing to play with domestic kitchenware I was interested to see what happened when you filled the void with rocks, thinking about sense of place and your ties or attachments to a geographic location. 


Living in Canada enables me to objectively look at my Australian history and heritage. I am interested in how our ties to the past inform our present and I am exploring this through the imagery of cameos, chain and branches.


This final piece is still in the middle of being created. Originally a porcelain tea cup, it has been broken and pieced back together. All attached by a silver chain. Here I am interested in the notions of sentimentality and how we place such importance on fragile objects. 

All these ideas seem quite disparate at the moment although I am hoping to distill their essence in my next semester next year. Its going to be quite the journey! 

Thursday, 27 November 2014

Snakes and Ladders : Enamel and Linen necklace

For our final assessment in Enamelling we had to create something that was inspired by 'games'. The word could be loosely interpreted and I chose the Snakes and Ladders board game I remembered fondly from childhood.

Snakes and Ladders prototype 1

To begin with, I made two different prototypes, experimenting with combining metal and woven linen thread. The first prototype was difficult to wear as the metal lengths stuck into the skin.

Snakes and Ladders Prototype 2

Redesigning my idea, I changed the linen thread to be more representative of a snake that weaves its way through the ladder. The design also changed the way it was worn, and the metal lengths no longer stuck into the wearer.


Cutting holes in the sterling silver lengths 

The next step was to make the design in sterling silver. After forging lengths of wire, I then cut holes into the flattened surface.

Plique a jour enamelled sterling silver

Using Plique a Jour methods (French for letting in daylight) I applied transparent enamel onto the cutout surface of the sterling silver.

Detail of the final Snakes and Ladders piece

Using a finer width of white linen, I wove the Plique a Jour lengths into place.


But before doing so, I had to thread the linen through sterling silver metal tube, which was then forged prior to threading the linen on the loom.


And this is the final result. 

Thursday, 13 November 2014

Enamel Lichen Necklace

Our second assignment for enamel class called for us to incorporate at least four enamelled components, which were to then be created into a piece of jewellery or an object.

With my current fascination into lichen I wanted to continue to explore these effects. I set about undertaking a lot of samples to achieve a similar result looking at the colours and textures in the image below.

Image of lichen used for reference for the project
Working with 0.3mm thick, fine silver 1" discs that were cut and then bent into a conical form. I first enamelled the inside with Orange Red Ruby enamel. I love this particular colour. Gold is one of the colorants in the enamel powder and depending on whether it is against silver or coper determines its colour. Sometimes it is a rich gold, like the images below, and sometimes it is ruby grapefruit. It is delicious!

work in progress: the cones prior to being assembled

The outside of the cone was enamelled with a black layer, followed by a fine sifting of 'Candy'. One of the things I enjoy about Candy is that is easily oxidises in the kiln, giving it a faint green tinge and is a little unpredictable in its results. Perfect for representing lichen. 

detail of the components necklace

I wanted to create a piece of jewellery that could be worn, but also exists by itself as a beautiful object, so I strung all the individual 18 cones onto silk cord.

Components necklace

The idea is that you roughly wrap one cord around the other and the enamelled pieces hang like a pendant. It needs a little refinement to be practical, and Im incredibly excited about its prospects.


Thursday, 23 October 2014

Enamelling: Collaborative Assignment Stage 4

We are up to the final stage where my original piece gets returned.....

I was so excited to get it back to see what changes had been made to it.

One side, the front with a green background and white pull through spots had remained untouched the entire time.

Sam has removed all the enamel on the reverse side and she had covered with a transparent lime green enamel. There were also bits of wire and copper attached using the original holes of the piece. Unfortunately I was too focused on making the final changes that I totally forgot to take a photo. Sam's additions reminded me a little of bark, and I contemplated incorporating some wood to the final piece. But I wasn't too sure that the transparent lime green worked with the deeper blue green of the other side.

So I undertook some more enamel experiments, looking to replicate lichen on the other side. I removed all the transparent line green and used stump grey as the base coat, and a light coat of oriental red over the top. The result was an amazing pull through that also highlighted the textured metal underneath.

Reverse side detail

I wasn't too sure how to finish the piece. Originally I was going to turn it into a brooch, but I felt that it restricted the viewer as to which side they observed (I really liked both sides in equal measures)

Reverse side

So I crocheted a form using the holes in the metal as a starting point. I really liked the void, so I left it a little open, and then crocheted some chain.


Front side detail of crochet

I made a point of making the chain long enough so that it was ambiguous as to how it could be worn.

Front side 

For example, it could be a necklace, wrapped around the wrist, or even inverted and worn on the head.... 

It was an exciting breakthrough for me and I am going to continue to explore this method of working.


Thursday, 16 October 2014

Enamelling: Collaborative Assignment Stage 3

This week we selected a piece of paper which had a number written on it. Then working backwards, from the highest number to the lowest, each person in the class had the opportunity to select an enamelled piece to work on.

I drew number one, which meant that I was lucky last. This worked well for me, because I truly don't know which object I would've selected had I the choice. And I ended up with Tamika's piece, that had recently been worked on by Candy.


Candy's rational for her enamelled colours was that the shape reminded her of flames, so she re-enamelled it from yellow through to red.

Funnily enough, this piece caused me many sleepless nights, as I pondered on how I was going to create some changes acknowledging the work done by Candy, but also make it sympathetic to Tamika and her personality and design aesthetic.

I found that the strong almost primary colours were too much for the delicate nature of the piece. In addition the enamel was starting to chip off some of the smaller areas.

So I removed all the enamel using a sand blaster. I had forgotten that there was texture on the original piece (Tamika had enamelled it using transparent colours which allowed the texture to come through)

Tamika's artwork back to copper

Because of the fragile nature of one of the joins, I decided to cut it up into three pieces. I turned two pieces into an asymmetrical pair of earrings. 


The shape and patterning of Tamika's original design always made me think of water, so I wanted to use enamels that had those qualities. I combined transparent turquoise with copper green to get depth in colour, and used the pull though technique with opaque white. 
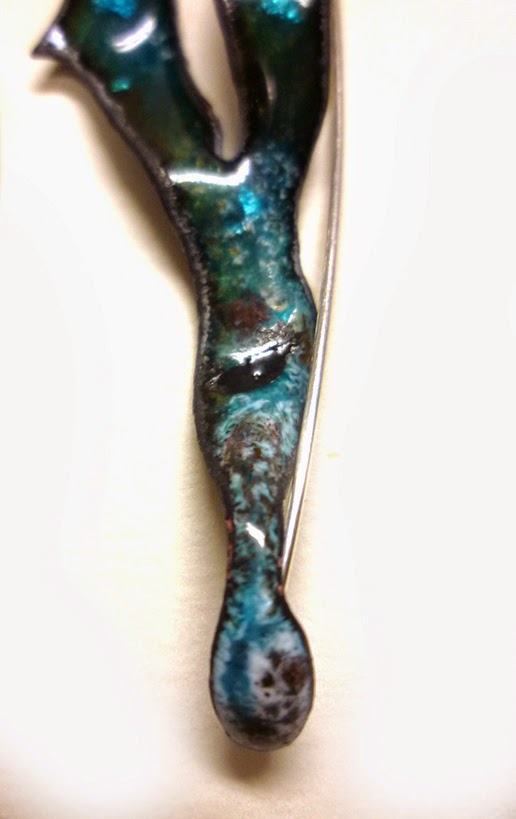
Detail of the opaque white pull through
Tiny bits of torn sterling silver foil was also added to give extra depth and reflective qualities.

Another detail of the earrings. 

The third piece I turned into a necklace.


Detail of necklace

When we had to present our changes to the class, I was really nervous. I didn't want to offend Candy.
But thankfully she was ok with my changes. Phew!

I have found this project to be incredibly enlightening. It has taught me that I am more concerned about working on another person's artwork, than I am on my own pieces. This is an outcome I find fascinating, since the concept of the project was to let go of ownership of your artwork and creativity.

Next week we get our original designs back for the original creator to finish. I wonder what mine will look like....


Thursday, 9 October 2014

Enamelling: Collaborative Assignment Stage 2

This week we drew numbers which corresponded with everyone's enamelled pieces. I got number 5, which happened to be JiHoo Lee's ring. Hoo is from South Korea and on exchange here in Canada for 6 months.

Hoo's ring
I love the design, its a very simple, yet clever and effective ring. It is made from one piece of copper which has been manipulated and threaded through itself to create the form.

One of the reasons why I think it is so clever is because the solder used to form shapes in jewellery often will melt in the enamelling kiln, so designs with enamelware need to take this into consideration.

Hoo modelling her ring, top view

Hoo modelling her ring, side view
Our assignment for this week as to manipulate up to 40% of the surface area.... I wanted to add to it, without compromising the design.

So I decided to use a stencil technique.

Stencil resist using a pressed flower

I have been collecting and pressing flowers recently. I am particularly drawn to the flower that grows wild called Queen Anne's Lace

Using a pressed Queen Anne's Lace flower, cobalt blue enamel and a 200 mesh sifter I gently sifted the enamel onto the ring.

And this is the result.

Hoo's ring with Queen Anne's Lace flower stencil - in progress.
Image by Thomas Miko

Hoo's ring with Queen Anne's Lace stencil
Image by Thomas Miko

Ill see if I can find an image of the changes to my piece that Hoo made (strangely enough we got each others piece!)


LinkWithin

Related Posts with Thumbnails