Thursday, 10 April 2014

Resin and Machine Embroidery

Heart houses 2.5 x 4 x 2.3 cm

I have been experimenting with machine embroidery, hand embroidery using reflective thread and embedding it into clear resin.


landscape embroidery embedded into a shape created from an antique hand saw

To create my own resin moulds I have been using a two part moulding paste (Pebeo silicon moulding paste) where you mix equal quantities of the blue and white paste for a minute until a uniform colour appears. It is quick to use and sets in about 5 minutes and is a little like working with oily Fimo (or polymer clay).

two part moulding paste house moulds

And I have worked with 2 different brands of resin: Pebeo Gedeo Crystal Resin and Castin' Craft Clear Polyester Casting Resin. Interestingly there was quite a bit of difference between the two. 

Pebeo Gedeo Crystal Resin took 24 hours to cure, was frosty where it came into contact with the mould and relatively smell free. I quite liked the 'softness' in the quality of the frostiness of the Pedeo Gedeo Crystal Resin, it is reminiscent of the sea washed glass you find on the beach. 

Castin' Craft Clear Polyester Casting Resin cured to the touch in less than 24 hours, was crystal clear even when it came into contact with the mould and was incredibly smelly. This one definitely needed to be used in a well ventilated space!  

House embroidery
embedded into the shape created from an antique hand saw

Whilst working with resin I discovered that you can:
  • sand it with sand paper (this gives you a frosty look) and also helps even out any unwanted lumps and bumps
  • paint it clear varnish (I used nail polish) which turns the sanded areas clear again 
  • speed up the curing time by placing it in a warm oven (preheated to 80 degrees C for 15 minutes) this process also encourages any bubbles to come to the surface and disappear

Thursday, 3 April 2014

In the studio: Salt of the Earth ceramics

Following weeks in the studio in which all my ceramic experiments seemed to disintegrate I decided to change direction and work with a more substantial and solid approach to my work, aiming to create bowls that appear to be carved from rock hewn from the earth.

Working with porcelain and oxides, my intention was to create bowls that represented layered strata of rock.

Salt of the Earth #1
Due to the extreme thickness of the slabs (about 20 x 20 x 30 cm) the slabs would require a couple of weeks to completely dry before the firing process could take place. 

Of course, I chose to rush this process and subsequently had a disaster where an entire kiln load of my work exploded because I tried to fire it too quickly.

A subsequent firing where the kiln was programmed to dry the clay for 24 hours before the firing process begun was much more successful and the results can be seen in Salt of the Earth #1 and #2.

Although there was some cracking in these pieces (probably due to the porcelain clay body rather than the firing process), I think it adds to the work and the idea of erosion. The pieces were fired once, skipping the bisque firing, in a reduction atmosphere. I really like how carbon has been trapped in the clay, turning it from pure white to a delicious grey. 

Salt of the Earth #2

Displayed with the ceramic landscape bowls are my Basket rings.


Thursday, 27 March 2014

The Drive: Animation

Well, here it is.....


the final version of 'The Drive'..... my animation project that combines a whole lot of animation techniques including stop animation (using frame by frame hand drawn images) which was inspired by some of the three dimensional sculptures I created using antique kitchen utensils; and rotoscoping (creating a moving image by drawing directly over the top of existing moving footage) which were then collaged onto some footage I had captured on a foggy drive to work one wintery morning.

Set to the tune 'Love Like a Sunset Part 1' by Phoenix I also blended a whole lot of different sounds (thanks to www.freesound.org - a great website where you can download and use sounds for free) to further animate my hand drawn creations.

The creation of animation has been described as 'moving at a glacial pace' and I have to agree that it is very time consuming. It is also a lot of fun, and no doubt I will be incorporating more animation in my future art projects.


Thursday, 20 March 2014

Basket Rings

In the ring course I learnt how to make a basic ring shape through annealing, bending and soldering the metal. 

Excitedly I put my new skills to the test and made a variety of rings using sterling silver, copper sheeting and thick copper wire. 

Basket ring (in progress). Sterling silver band, woven copper, brass and silver wire.
Image: Christina Arsenault 
I wanted to experiment with small woven wire structures that were attached to the band - relating to basketry and referring to my ongoing interest with pioneers and the native foods they would have to gather and eat in their new countries.

Basket Ring. Copper sheeting with woven copper wire.
Image: Christina Arsenault 
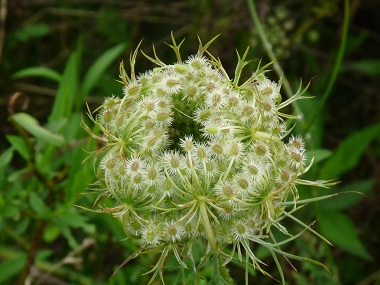
The delicate nature of the woven wire baskets reminds me a little of the flower that was abundant across Nova Scotia in summer last year, Queen Anne's Lace. After a little research I also discovered that Queens Anne's Lace is also known as 'wild carrot' and the root can be eaten, like a carrot. No doubt these plants would've been eaten by the pioneer settlers of Nova Scotia.

Queen Anne's Lace flower.

Basket Ring (in progress). Copper wire band, woven brass and silver wire.
Image: Christina Arsenault  
These rings are the beginning of a entire new series of work which I am incredibly excited about.

Im thinking I will display them with my ceramic works that look like slabs of rock cut from the earths surface. 

Thursday, 13 March 2014

Kochira the Cat Kelly Animated

Ive been teaching myself the basics of some of the Adobe Creative Suite animation software programs such as Flash and After Effects.


Based on some footage I took whilst driving on the highway between Sydney and Canberra I have included the iconic Ned Kelly imagery by Sidney Nolan. However, Ned Kelly has been slightly adapted to be Kochira the Cat Kelly using Photoshop.

Heres a little snippet of what I am currently working on.


The snippet comes from a larger piece that I am working on. I couldn't wait for the entire piece to be finished (its over 5 minutes long which is an eternity of work in animation terms), so I thought I would share just a little bit with you.

It is a work in progress and not entirely polished yet.


Thursday, 6 March 2014

Hollowware: Learning to fabricate

Our second project in Hollowware was to learn to solder joints, and make a 5 sided cube.

5 sided brass cube being held together with wire before soldering
 Although it looks relatively straight forward, the project is incredibly tricky, trying to get all angles at 90 degrees is more difficult than it looks!

And then there are the hours (literally) of sanding and polishing and elbow grease to get it to look like this....


Phew!

After learning how to make cubes we were given a project to design something that would hold an egg.

Starting with the basic concept of a cone, I explored many variations before coming up with this one.


Copper finished with green patina, and highly polished tentacles

The green patina then turned the most amazing purple from a couple of hours soaking in ammonia fumes.

Fun stuff and the purple was the most wonderful iridescent colour... and not even a colour our teacher had seen before either!

Thursday, 27 February 2014

Iceberg Ring

In my quest to develop my jewellery skills I signed up for a ring course earlier this year. We were introduced to a variety of basic techniques including wax forming and simple stone settings.

Idea taking shape for Iceberg ring in wax.
I liked all the edges so it was designed to be worn in all three ways.
It was a fascinating process to see how a wax form is translated into metal. First the wax shape is placed in a plaster mould. The wax is then melted, leaving a hollow for the metal to fill.

Melting the silver to go into the wax cast 
The plaster cast is placed into a centrifuge and the metal, in my case silver, is melted. 

Iceberg ring as it looks freshly cast
To enhance the ring I decided to add a small black gem. Using a variety of tools I carved a hole into the ring to create the setting.

Learning to do a simple 'gypsy' stone setting 
And this is the final result! 

The finished Iceberg Ring

LinkWithin

Related Posts with Thumbnails