Showing posts with label hollowware. Show all posts

Thursday, 23 October 2014

Enamelling: Collaborative Assignment Stage 4

We are up to the final stage where my original piece gets returned.....

I was so excited to get it back to see what changes had been made to it.

One side, the front with a green background and white pull through spots had remained untouched the entire time.

Sam has removed all the enamel on the reverse side and she had covered with a transparent lime green enamel. There were also bits of wire and copper attached using the original holes of the piece. Unfortunately I was too focused on making the final changes that I totally forgot to take a photo. Sam's additions reminded me a little of bark, and I contemplated incorporating some wood to the final piece. But I wasn't too sure that the transparent lime green worked with the deeper blue green of the other side.

So I undertook some more enamel experiments, looking to replicate lichen on the other side. I removed all the transparent line green and used stump grey as the base coat, and a light coat of oriental red over the top. The result was an amazing pull through that also highlighted the textured metal underneath.

Reverse side detail

I wasn't too sure how to finish the piece. Originally I was going to turn it into a brooch, but I felt that it restricted the viewer as to which side they observed (I really liked both sides in equal measures)

Reverse side

So I crocheted a form using the holes in the metal as a starting point. I really liked the void, so I left it a little open, and then crocheted some chain.


Front side detail of crochet

I made a point of making the chain long enough so that it was ambiguous as to how it could be worn.

Front side 

For example, it could be a necklace, wrapped around the wrist, or even inverted and worn on the head.... 

It was an exciting breakthrough for me and I am going to continue to explore this method of working.


Thursday, 2 October 2014

Enamelling: Collaborative Assignment Stage 1

Our current class assignment for Enamelling is an exercise to expand the creative process by working collaboratively, where multiple creative minds work together often the partnership leads to greater objectivity in decision making whilst learning to become detached, or at least, less precious about the artwork.

The object of the assignment is to explore enamelling techniques in relation to form, whilst working within a collaborative process.

Stage 1: Each student must make a form which is then enamelled using the techniques being taught in class.

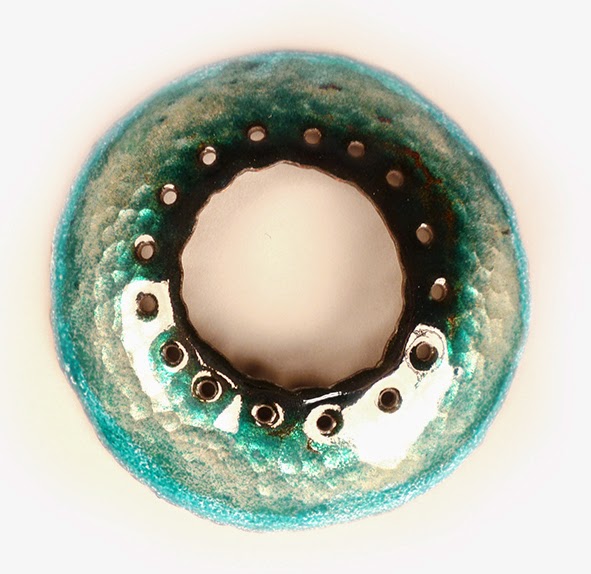
Hollowware formed metal object approximately 8cm in diameter 
This is my shape prior to the enamelling process. We are not allowed to disclose to the class what the intention of the form is, allowing for unrestricted creativity for the other students.

One side enamelled using pull through techniques

I then enamelled the shape, using a result I achieved (read: stumbled across by accident) whilst doing tests. 

Detail of pull through technique


The other side was undertaken in a similar fashion using the same enamels, but a slightly different application, to allow for the texture in the metal to show through.

Other side of copper form.

Detail of hammered metal surface under the transparent flux and enamels.
Stage 2: The object is them passed onto one of the other students. They then can transform 40% of the total enamel surface. It will be interesting to see what changes the object undergoes through being worked on by different people with different aesthetics.

Stage 3: The form is then selected by another student who has free artistic licence to decide how to best 'edit' the piece and make the necessary changes. All decisions must be justified.

Stage 4: The final stage of the assignment is when the piece is then returned to the originator, who then has the opportunity to finish off the piece, or to create a new piece based on the information gathered during the collaborative process.

Watch this space as the project progresses!

Thursday, 29 May 2014

Hollowware: Egg Cup Design

Earlier in the year I designed and created an egg cup in my Hollowware course.

When it was first made it had the most amazing and unusual purple patina. (Pictures of the egg cup in an earlier post can be seen here.)

Now, a couple of months later it has faded to an aged icy turquoise blue. The high polish on the 'tentacles' has remained a beautiful dark copper colour. The blue patina was achieved by placing the copper with a green patina in a lidded bowl full of wood chips soaked in ammonia. The fumes of the ammonia turn the green patina blue!


And below are some of the designs that were discarded in the designing process. 


I would still like to make them....... maybe one day! 

Here are some websites on how to make different coloured patina's using ingredients generally found at home:


Thursday, 6 March 2014

Hollowware: Learning to fabricate

Our second project in Hollowware was to learn to solder joints, and make a 5 sided cube.

5 sided brass cube being held together with wire before soldering
 Although it looks relatively straight forward, the project is incredibly tricky, trying to get all angles at 90 degrees is more difficult than it looks!

And then there are the hours (literally) of sanding and polishing and elbow grease to get it to look like this....


Phew!

After learning how to make cubes we were given a project to design something that would hold an egg.

Starting with the basic concept of a cone, I explored many variations before coming up with this one.


Copper finished with green patina, and highly polished tentacles

The green patina then turned the most amazing purple from a couple of hours soaking in ammonia fumes.

Fun stuff and the purple was the most wonderful iridescent colour... and not even a colour our teacher had seen before either!

Thursday, 13 February 2014

Hollowware: First project

Something I have always wanted to do is learn the basics of metal smithing, and my lack of skills and desire to know more became apparent last year when I was playing in the jewellery studio at the NSCCD residency in Halifax.

So I decided to enrol in a hollowware class.

Our first project was to learn some of the basic forging techniques, and below are my first samples. They are tres dodgy!


After learning the basics of stretching the metal in various ways, we then had to design either a spoon or butter knife using our new skills. 

I wanted to make a butter knife based on the idea of a shooting star. By this stage I was starting to understand the techniques involved to manipulate the metal (a lot of hammering and a sore arm!). And I ended up with this.

Shooting Star butter knife.  Brass 17.5cm long x 1.6cm wide
Not bad for my first attempt!

LinkWithin

Related Posts with Thumbnails